Ruby + Ruby on Rails tutorial
Note that this isn't finished and may never be finished, but I didn't want it to stagnate in my Proofs box any longer. So take what you can from it.
You, like me, have probably heard all of the hype around Ruby on Rails. "Convention over configuration" they say, and "Don't Repeat Yourself" are common Ruby on Rails adages. Well, it's true. Creating a new database is as simple as telling Rails your database credentials and typing a single command. Adding new tables takes just a single command.
When I set out to learn Ruby on Rails, I was beset with a bit of confusion. Rails 2.0 was released recently (December '07) and Ruby 2.0 is coming out soon. As a result of the Rails thing, there are a lot of out-of-date tutorials out there. So hopefully this will help someone out there trying to learn Rails right now.
Audience: Some programming experience (preferably web programming), but no Ruby/Rails experience.
Any operating system, but some bias towards Linux/Ubuntu
Goals:
- Set up a development environment for Ruby and Rails
- Write hello world in Ruby
- Learn some Ruby syntax
- Learn some Rails commands
- Write hello world in Rails
- Output data from a database
- Take form data and update a database
- Introduce Rails API for flash, style, javascript
- Introduce flash variables
- Apply style sheets
- Apply javascript files
- Prepare for future (Ruby 2.0)
Finally, this tutorial uses the following technologies and versions:
- Ruby: 1.8.6
- Rails: 2.0.2
- Rake: 0.8.1
- Rubygems: 1.0.1
If you're still interested, read on!
As an aside, I'm performing all these actions on an Ubuntu installation, a popular flavor of Linux. For other operating systems, I'll point out what should be changed (if I know about it).
Setting up your environment
This entails three things: installing Ruby, installing Rails, and (presumably) installing MySQL.
Ruby
Windows
I don't know about Windows personally, but you can find out more information about setting up Ruby+Rails here. As a shortcut, you'll probably just want to use InstantRails -- a Ruby/Rails/MySQL/Apache server that requires no configuration.
Linux
Ubuntu
The Community Ubuntu Documentation was immensely helpful for getting the best installation up and running. To summarize what's written here, perform the following steps:
- Install Ruby with
sudo apt-get install ruby rdoc irb libyaml-ruby libzlib-ruby ri libopenssl-ruby ruby1.8-dev
(5 megs zipped/55 megs unzipped)
Also throw in libsqlite3-dev if you plan on using sqlite3 as your main db storage (recommended for development) - Install RubyGems from source. Resist the temptation to install it from the Ubuntu repository -- it'll just complicate things down the road, and this has an autoupdater anyway.
wget http://rubyforge.org/frs/download.php/29548/rubygems-1.0.1.tgz
tar xzvf rubygems-1.0.1.tgz
cd rubygems-1.0.1
sudo ruby setup.rb	(this step may take a while)
- Check to see whether RubyGems got installed as gem1.8 (type ls /usr/bin/gem*). If it did (as mine did), create a link with
sudo ln -s /usr/bin/gem1.8 /usr/bin/gem
As the final step of our RubyGems installation...
sudo gem update --system (this step may also take a while)
Don't worry about getting the latest version of RubyGems -- the last statement will update it regardless. If you must check to see that 1.0.1 is still the latest version, here's the link.
- Install Rails and its dependencies.
sudo gem install rails
- Compare the versions you have installed with the versions I have listed at the top of this page. To check Ruby, type
ruby -v
To check everything else (the gems), type
gem list --local
Other Distributions
See below at Other Operating Systems.
Other Operating Systems
See here.
Checking your installation
Hopefully that went well for you. To make absolutely sure we're all on the same page, check that your environment is indeed set up by executing ruby -v, rails, and gem. They should all yield non-errors. To check versions, use ruby -v (as before) to check ruby and gem list --local to check your gems. They don't have to be exactly the same as I have above, but if they're different, this tutorial might not be 100% valid.
Good! Smooth sailing, right? Right.
Take a break
So, you're ready to dive in to Ruby on Rails, right? Before we do, I'd like to explain some of the stuff we've covered done far, at least as far as terminology. Ruby is the programming language, Ruby on Rails is the web application framework and RubyGems is a repository for gems, which are self-contained libraries. In case you're curious about some of the gems out there, here's a raw list I made: List of gems as of Mar. 20, 2008. There's also the RailsLodge.
Ruby
If you don't know anything about Ruby, you should become at least slightly familiar with it before diving into Rails. Here's the crash course!
Hello World
There are two ways to execute stuff with ruby, invoking ruby directly and using CTRL-D after you're done typing, or you can use irb, which is what I'll be using and is recommended. "irb" is for "interactive ruby" and you can use CTRL-D or type "exit" to quit.
So, start irb!
Type print 'hello world'. You'll see a line "hello world=> nil". nil is Ruby's word for null/nothing.
Variables
Well, that was easy. Let's learn more about variables.
You can simply say world = "world, how great it is" to set the variable `world`. Like PHP, you can insert the values of variables directly into strings. Try the following: `print "hello #{world}"`. Also similar to PHP, try `print 'hello #{world}'`. Notice the difference? When you enclose strings in single quotes, Ruby does not try to parse the contents of the string. So in conclusion, if a string contains (or may contain in the future) other variables, use double quotes. Otherwise, use single quotes. It's a small thing, but there's no point in wasting CPU cycles.
Arrays
Let's talk arrays. Create a new array with `happy = ['hello', 'how', 'are', 'you?']`. Try typing happy.length(). That gets the number of elements in the array. But here's something really trippy -- try `happy.length`. Same result! That's right, the parentheses in method calls are optional (and in fact, rarely used). Try typing `happy.to_s`. Hmm, sort of neat, but too condensed (to_* is how you convert to different data types; s for string, a for array, i for integer, etc). Type `happy.join ' '` instead. This glues all the elements together using a space. Array lookups are also familiar, as demonstrated by `print "#{happy[0]} world"`.
Control Structures and Iteration
Alright, enough of variables and methods. Time for some other stuff. Control structures! These are pretty much the same as most other languages, so I'll just give some examples.
if:
if 1 < 2

print "one is less than two"

end
if-elseif-else:
if 2 < 1

print "two is less than one"

elsif 2 > 1

print "two is greater than one"

else

print "two and one are equal"

end
for:
for i in 1..10

print i.to_s + "\n"

end
(note: the above prints 1, 2, ..., 9, 10. If you want to print 1, 2, ..., 8, 9, don't say 1..10-1, say 1...10. Just remember, two dots means "up through" and three dots means "up to")
setup for iteration...:
beautiful_day = ['don\'t', 'let', 'it', 'get', 'away']
...value only:
beautiful_day.each do |v|

print v + " what?\n"

end
...index only:
beautiful_day.each_index do |i|

print i.to_s + " is my favorite number\n"

end
...index and value:
beautiful_day.each_with_index do |val, i|

print "The value at #{i} is #{val}\n"

end
Method naming conventions
This brings up a chance for a new naming convention: methods ending in a ? or a !. ? means "I return a boolean value" and ! means "warning, I change my arguments". Let's check it out.
`
twister = "she sells seashells"
twister.capitalize
twister
`
Notice how twister.capitalize outputs the capitalized version, but the twister variable still contains the original lowercase version, so...
`
twister.capitalize!
twister
`
NOW twister is capitalized for good.
If you want to explore more on your own, go ahead and type twister.methods.sort or beautiful_day.methods.sort. Extra credit: find the methods for changing the case of the entire string, or the method to check to see if a particular value is in an array.
Classes
Okay. So Ruby is Object-Oriented, which means you can create classes, have them inherit the properties of other classes, have instance and static variables, and have methods. Let's see some of this in action. Here's an example I'm going to walk through line by line.
This is a crude Fibonacci number generator. In its constructor, there's an optional usecache variable that specifies whether the class should save previously generated Fibonacci numbers. Besides that, this is a fairly regular Fibonacci function.
class Fibonacci # line 1

attr_reader :calls_so_far
def initialize usecache=false
@cache = [] # line 5
@calls_so_far = 0
@usecache = usecache
end
def fibbo i # line 10
if @usecache and not @cache[i].nil?
return @cache[i]
end
# line 15
@calls_so_far += 1
if i <= 0
0
elsif i == 1
1 # line 20
elsif @usecache
@cache[i] = (fibbo i-1) + (fibbo i-2)
@cache[i]
else
(fibbo i-1) + (fibbo i-2) # line 25
end
end
def resetcount
@calls_so_far = 0 # line 30
end
end
Line 1: creates a class called Fibonacci
Line 2: creates an attribute reader for the class variable calls_so_far. This is effectively a "getter" for this variable -- instead of writing a method just for getting this variable, you can simply use attr_reader. Similarly, you can use attr_writer for setters and attr_accessor for getters and setters. If you want multiple variables for attr_reader, just separate them with a space (i.e. attr_reader :myvar1, :myvar2, etc).
This bring up two more points: scope and symbols. @ signifies an instance variable (i.e. every instance of a class has a copy of the variable) and @@ signifies static variables (i.e. every class has one and only one variable, regardless of the number of instances).
Symbols are....slightly more complicated, but their usage can be inferred from context. [todo].
Line 4: initialize is how you define constructors. In any method, you can define a default value for a parameter by saying =somedefault.
Line 5: initialize the instance variable `cache` to an empty array
Line 6: initialize the instance variable `calls_so_far` to 0.
Line 7: initialize the instance variable `use_cache` to the local variable (or rather, argument) `use_cache`
Line 10: define a new method factorial that takes 0 arguments.
Line 11: if this instance of Fibonacci is set to use the cache, AND i is in the cache array, AND that value in the cache array isn't nil, then return that value.
Line 16: increment the call_so_far variable
Line 18: You'd think just saying "1" here wouldn't do anything, but in fact, Ruby functions always return something. If you don't manually specify "return x" anywhere, Ruby will simply return the value of the statement it executes. You could say "return 1", "return @cache[i]", "return (fibbo i-1)...", but you don't need to.
Line 22-23: Store the value of the two functions added and then return it.
Line 25: Just execute and return the sums of the previous two Fibonacci numbers. This only executes if i > 0 and @usecache is false.
Line 30: Reset the @calls_so_far variable.
Okay, I hope that wasn't too much. To run this file, put it in a convenient directory and call it Fibonacci.rb. Then navigate to that directory in the terminal and call `ruby Fibonacci.rb`. Right now it doesn't do much, so let's generate some test code. Add this below the last end:
`helper = Fibonacci.new
for i in 1..25
print i.to_s + ": " + helper.fibbo(i).to_s + "\n"
end
print "number of fibbo calls w/o cache: #{helper.calls_so_far}\n"
cachedhelper = Fibonacci.new true
for i in 2..25
print i.to_s + ": " + cachedhelper.fibbo(i).to_s + "\n"
end
print "number of fibbo calls w/ cache: #{cachedhelper.calls_so_far}\n"
cachedhelper.resetcount
for i in 2..25
print i.to_s + ": " + cachedhelper.fibbo(i).to_s + "\n"
end
print "number of fibbo calls, precached: #{cachedhelper.calls_so_far}\n"
`
The first generator doesn't use caching. The second one does, and the third one reuses the caching the second test generates. Neat huh?
Conclusion
This isn't meant to be the everything tutorial, but you've still hopefully learned a lot. You've yet to learn about inheritance, exceptions, or database interaction in Ruby. You can learn about inheritance here, exceptions here, and database interaction here. Fear not with database interaction though; if you're using Rails, you'll hardly even know you're using a database.
Enough of Ruby though, let's get on to the heart of the matter: Rails!
Hello World!
For our first application, we're going to do everyone's favorite first-program-of-the-language, Hello World. Not surprisingly, this isn't terribly difficult, so let's go!
Open up a terminal. Create a "projects" directory where you want all your future projects to go in. cd into that, and type
rails -d mysql HelloWorld
This creates a RoR application in a subdirectory called HelloWorld and instructs it to use the mysql database engine. (If you don't specify the -d, it defaults to sqlite3, a file-based database. Other options are mysql/oracle/postgresql/sqlite2/sqlite3)
Now boot 'er up.
cd HelloWorld./script/server (on Windows, you always have to explicitly invoke ruby, so this command would be "ruby script/server")
You should see "Booting WEBrick...blah...Rails application started on http://0.0.0.0:3000". Put that URL into your browser (or localhost:3000, same thing, apparently). You should see "Welcome aboard", etc etc. If you're using Apache instead of Rails, fire that up and head to http://rails/ (or whatever your server name is) and hopefully you'll see the same message.
Terminology Time
Time to explain some important terminology. First: Rails is a specific type of framework -- an MVC framework. That's Model-View-Controller. The Model represents a usually tangible object -- a person, a recipe, a data record -- and contains all of the methods for poking the database to get information out. The View is what the user sees -- spitting out the final output of everything else, usually in the form of HTML with scattered bits of Ruby logic. The Controller is what brings the two together, capturing Model data into variables that the View can use, as well as performing all of the "business logic". Additionally, it's the controller that determines which view gets loaded, based on the URL the user is accessing.
Extra credit: the public methods in the Controllers are referred to as Actions and Views are actually referred to as Templates.
Building the database
Okay okay, so why does "Hello World" need a database? Short answer: it doesn't. But every Rails installation expects that the database specified in config/databases.yml actually exists, so we must appease the Rails Server. Rather than try circumvent this, how about we just create the databases it wants. Now's as good a time as any to show you how to generate the development database. Simply type
rake db:create
and you're done. Take a peek at config/databases.yml if you're curious about what databases Rails expects, and change it if you want. Note: only the development database gets made with the above command. What operations rake applies to depends on the RAILS_ENV variable, which...we'll get into later.
Quick Digression
Rake is an application meant for, well, maintenance of your rails application. Not only that, but it handles all sorts of tasks, like migrating databases around and running unit tests. To see your options, type
rake --tasks
Back on track
Finally, back to the fun stuff. Let's generate our controller!
./script/generate controller hello index
This generates a controller called "hello" with a single action called "index". The format of urls is generally http://server/controller/action/some/other/variables . Since Rails 2.0 loads routes at start time, we'll need to restart our server now for the change to take effect. (routes are like mappings from URL to controller)
Head over to http://localhost/hello . Similar to regular servers, if the action isn't specified, then "index" is assumed. As such, adding "/index" to the previous URL will also technically work but is redundant. You should get a very simple page that looks like this:
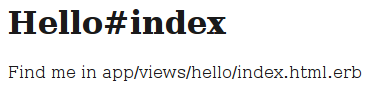
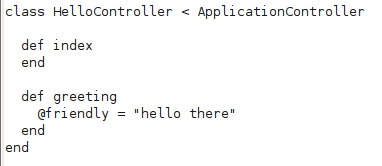
Hmm, so if you open up app/view/hello/index.html.erb, you should find some familiar but uninteresting text. If we wanted to, we could modify this, but there'd really be no point since no dynamic data is being passed to the view. How do we do that? Why, in the controller of course...
Let's open that controller up. It's app/controller/hello_controller.rb. Here you see a HelloController class that inherits from ApplicationController (whose source file is also located in app/controller) and a single public method (action), index. Just for kicks, let's add another action, called greeting, containing a single line of source, @friendly = "hello there". It should look like this: